Reading mode
Before starting the creation of a CSV driver, it's important to consider the type of reading you intend to perform on the file. This depends on the machine setup. It can be one of:
- Reading a single row at a time (the machine creates a single file in 'append' mode).
- Reading multiple rows at the same time (the machine creates one file at a time with multiple rows).
Case 1: Reading a single row at a time (append mode)
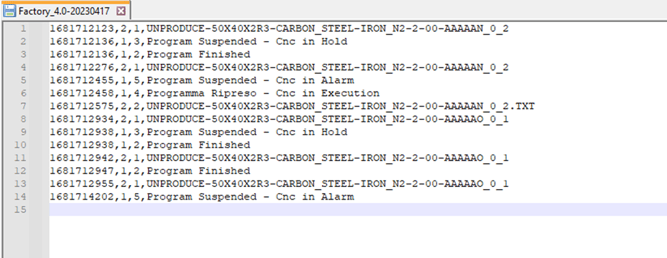
We have a machine that adds to the output file a row every time the machine finishes processing, with the process output information. The output file is the same for all outputs (it may change once a day or more, but not depending on the production process).
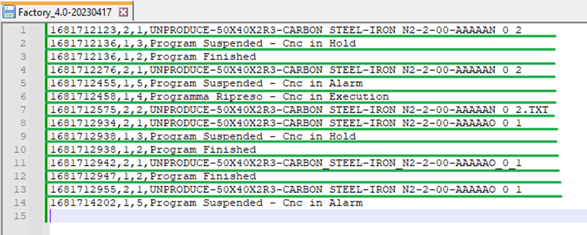
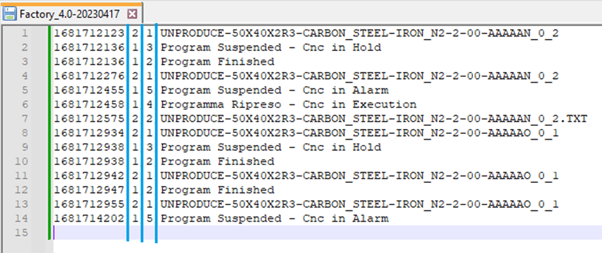
In this sample case, there are 4 parameters (from left to right): Timestamp, par1, par2, status, all separated by a comma (,).
The command used to navigate a single-row files that must to be inserted in the driver editor is:
allfile.split("\n")[allfile.split("\n").length-1].split(",")[x]
Note: """ is used instead of double quotes " ", where ("\n") means: (“\n”)
`allfile.split("\n")` means: split the file every time you see a newline character (\n), and with `[allfile.split("\n").length-1]`, we indicate which "row" to point to. In this case, we use length-1 because a new row is added each time the machine updates the job status.
`split(",")[x]` allows us to move within the row identified by the previous command. Inside the parenthesis, we define how the parameters in the row are separated; in this case, it's the comma ",". In the square brackets, we indicate the position from which we want to acquire the data
For example:
for the variable Timestamp we will use the following command:
allfile.split("\n")[allfile.split("\n").length-1].split(",")[0]
For the variable Status:
allfile.split("\n")[allfile.split("\n").length-1].split(",")[3]
Mapping variables through the Alleantia Web Editor:
Variable mapping sample:
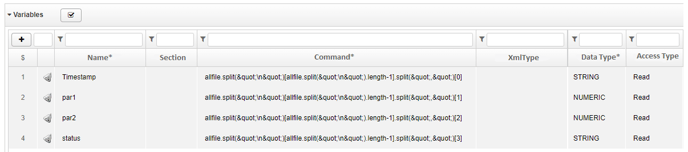
Variable Timestamp:
- In the "Name" field: Timestamp.
- In the "Command" field: `allfile.split("\n")[allfile.split("\n").length-1].split(",")[1]`.
- In the "Data Type" field: String.
Variable par1:
- In the "Name" field: par1.
- In the "Command" field: `allfile.split("\n")[allfile.split("\n").length-1].split(",")[1]`.
- In the "Data Type" field: Numeric.
Variable par2:
- In the "Name" field: par2.
- In the "Command" field: `allfile.split("\n")[allfile.split("\n").length-1].split(",")[1]`.
- In the "Data Type" field: Numeric.
Variable Total Status:
- In the "Name" field: Total Status.
- In the "Command" field: `allfile.split("\n")[allfile.split("\n").length-1].split(",")[]`.
- In the "Data Type" field: String.
Note: You can concatenate multiple separators and use different commas in the same driver.
Case 2: Reading multiple rows at the same time
In this case, we have a machine that generates a new file with several rows upon completing the operational process (e.g., recording processes over a longer period than the actual execution).
In the following sample file, there are 5 parameters: Status, Table, Operator, TotalPieces, GoodPieces.
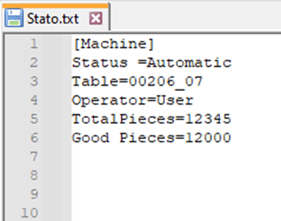
We have the variable name followed by the "=" sign and the corresponding value, which will be the parameter of our interest to map.
Since the machine generates a new file each time, the position of the rows from which to extract the values will always be the same. We will use the following command:
allfile.split("\n")[allfile.split("\n").[y].split("=")[x]
NOTE: " is used instead of double quotes " ", where ("\n") means: (“\n”),
and .[y] specifies the row to read (y=0, y=1...).
For example, the command for the Status variable, will be:
allfile.split("\n")[allfile.split("\n").[1].split("=")[1]
For the Table variable:
allfile.split("\n")[allfile.split("\n").[2].split("=")[1]
Mapping variables through the Alleantia Web Editor:
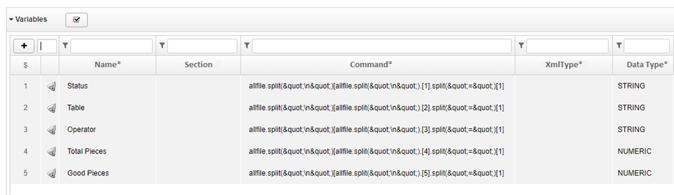
Variable Status:
- In the "Name" field: Status.
- In the "Command" field: `allfile.split("\n")[1].split(",")[1]`.
- In the "Data Type" field: String.
Variable Table:
- In the "Name" field: Table.
- In the "Command" field: `allfile.split("\n")[2].split(",")[1]`.
- In the "Data Type" field: String.
Variable Operator:
- In the "Name" field: Operator.
- In the "Command" field: `allfile.split("\n")[3].split(",")[1]`.
- In the "Data Type" field: String.
Variable Total Pieces:
- In the "Name" field: Total Pieces.
- In the "Command" field: `allfile.split("\n")[4].split(",")[1]`.
- In the "Data Type" field: Numeric.
Variable Good Pieces:
- In the "Name" field: Total Pieces.
- In the "Command" field: `allfile.split("\n")[5].split(",")[1]`.
- In the "Data Type" field: Numeric.
Note: You can concatenate multiple separators and use different commas in the same driver.
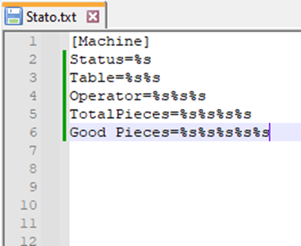
Writing Mode
Writing through the File driver is possible using a Template, which is a CSV file structured like the machine input file. Values will be replaced by placeholders %s at the time of writing.
In addition to the Template, two variables are needed: "FILENAME" and the "TRIGGER" variable.
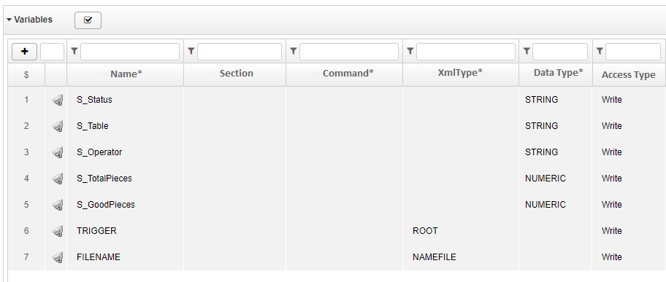
To add a writing variable, click the "+" button under "Variables."
Variable Status:
- In the "Name" field: S_Status.
- In the "Data Type" field: String.
- In the "Access Type" field: Writing.Variable Table:
- In the "Name" field: S_Table.
- In the "Data Type" field: String.
- In the "Access Type" field: Writing.
Variable Operator:
- In the "Name" field: S_Operator.
- In the "Data Type" field: String.
- In the "Access Type" field: Writing.
Variable Total Pieces:
- In the "Name" field: S_Total Pieces.
- In the "Data Type" field: Numeric.
- In the "Access Type" field: Writing.
Variable Good Pieces:
- In the "Name" field: S_Total Pieces.
- In the "Data Type" field: Numeric.
- In the "Access Type" field: Writing.
Variable TRIGGER
- In the "Name" field: TRIGGER.
- Set "Access Type" to write.
- In "XML Type," put "ROOT".
Variable FILENAME
- In the "Name" field: FILENAME .
- Set "Access Type" to write.
- In "XML Type," put "NAMEFILE".